Setting Up and Configuring OBS or ShowStream
--------------------------------------------------------------
What is OBS: Open Broadcaster Software is free open source broadcasting/streaming software for Mac and Windows desktop computers.
--------------------------------------------------------------
Adding RTMP info into OBS/ShowStream:
- Open software application
- Click on "Settings" in lower right or chose OBS, Preferences from the main menus.
- Click "Stream"
- Choose "Custom" from drop down.
- Login to ShowTix4U.com and click on either “Rehearsal Stream Credentials” (Rehearsal) under the event poster gear icon OR “Live Stream Credentials” (Live Show) under the date gear icon.
- Copy the RTMP URL from the ShowTix4U window
- Go back to OBS and paste the ShowTix4U RTMP URL into the "Server" field in OBS.
- Go back to ShowTix4U and copy the “Stream Key”
- Go back to OBS and paste the ShowTix4U Stream Key into the Stream Key field in OBS.
- You do not need authentication.
- Click "OK"
- You Stream will now stream into your ShowTix4U event when you go live.
- Test your internet speed before your event: https://www.speedtest.net/.. While not required, it is recommended you use an internet hard line to your computer. For a list of adapters visit this link: https://showtix4u.helpsite.com/articles/57277-internet-considerations
- Take the UPLOAD speed it gives you (NOT the download speed) and compare to the “Upload Speed” chart to see what resolution your network can handle.
Upload Speed |
Resolution |
Required Bitrate |
Under 1.5 Mbps |
360p |
300-800 kbps |
1.5 Mbps to 5 Mbps |
480p |
500-1500 kbps |
5 Mbps to 10 Mbps |
720p |
1000-3000 kbps |
10-20 Mbps |
1080p |
2000-5000 kbps |
- Open OBS and click on "Settings" in lower right or chose OBS, Preferences from the main menus.
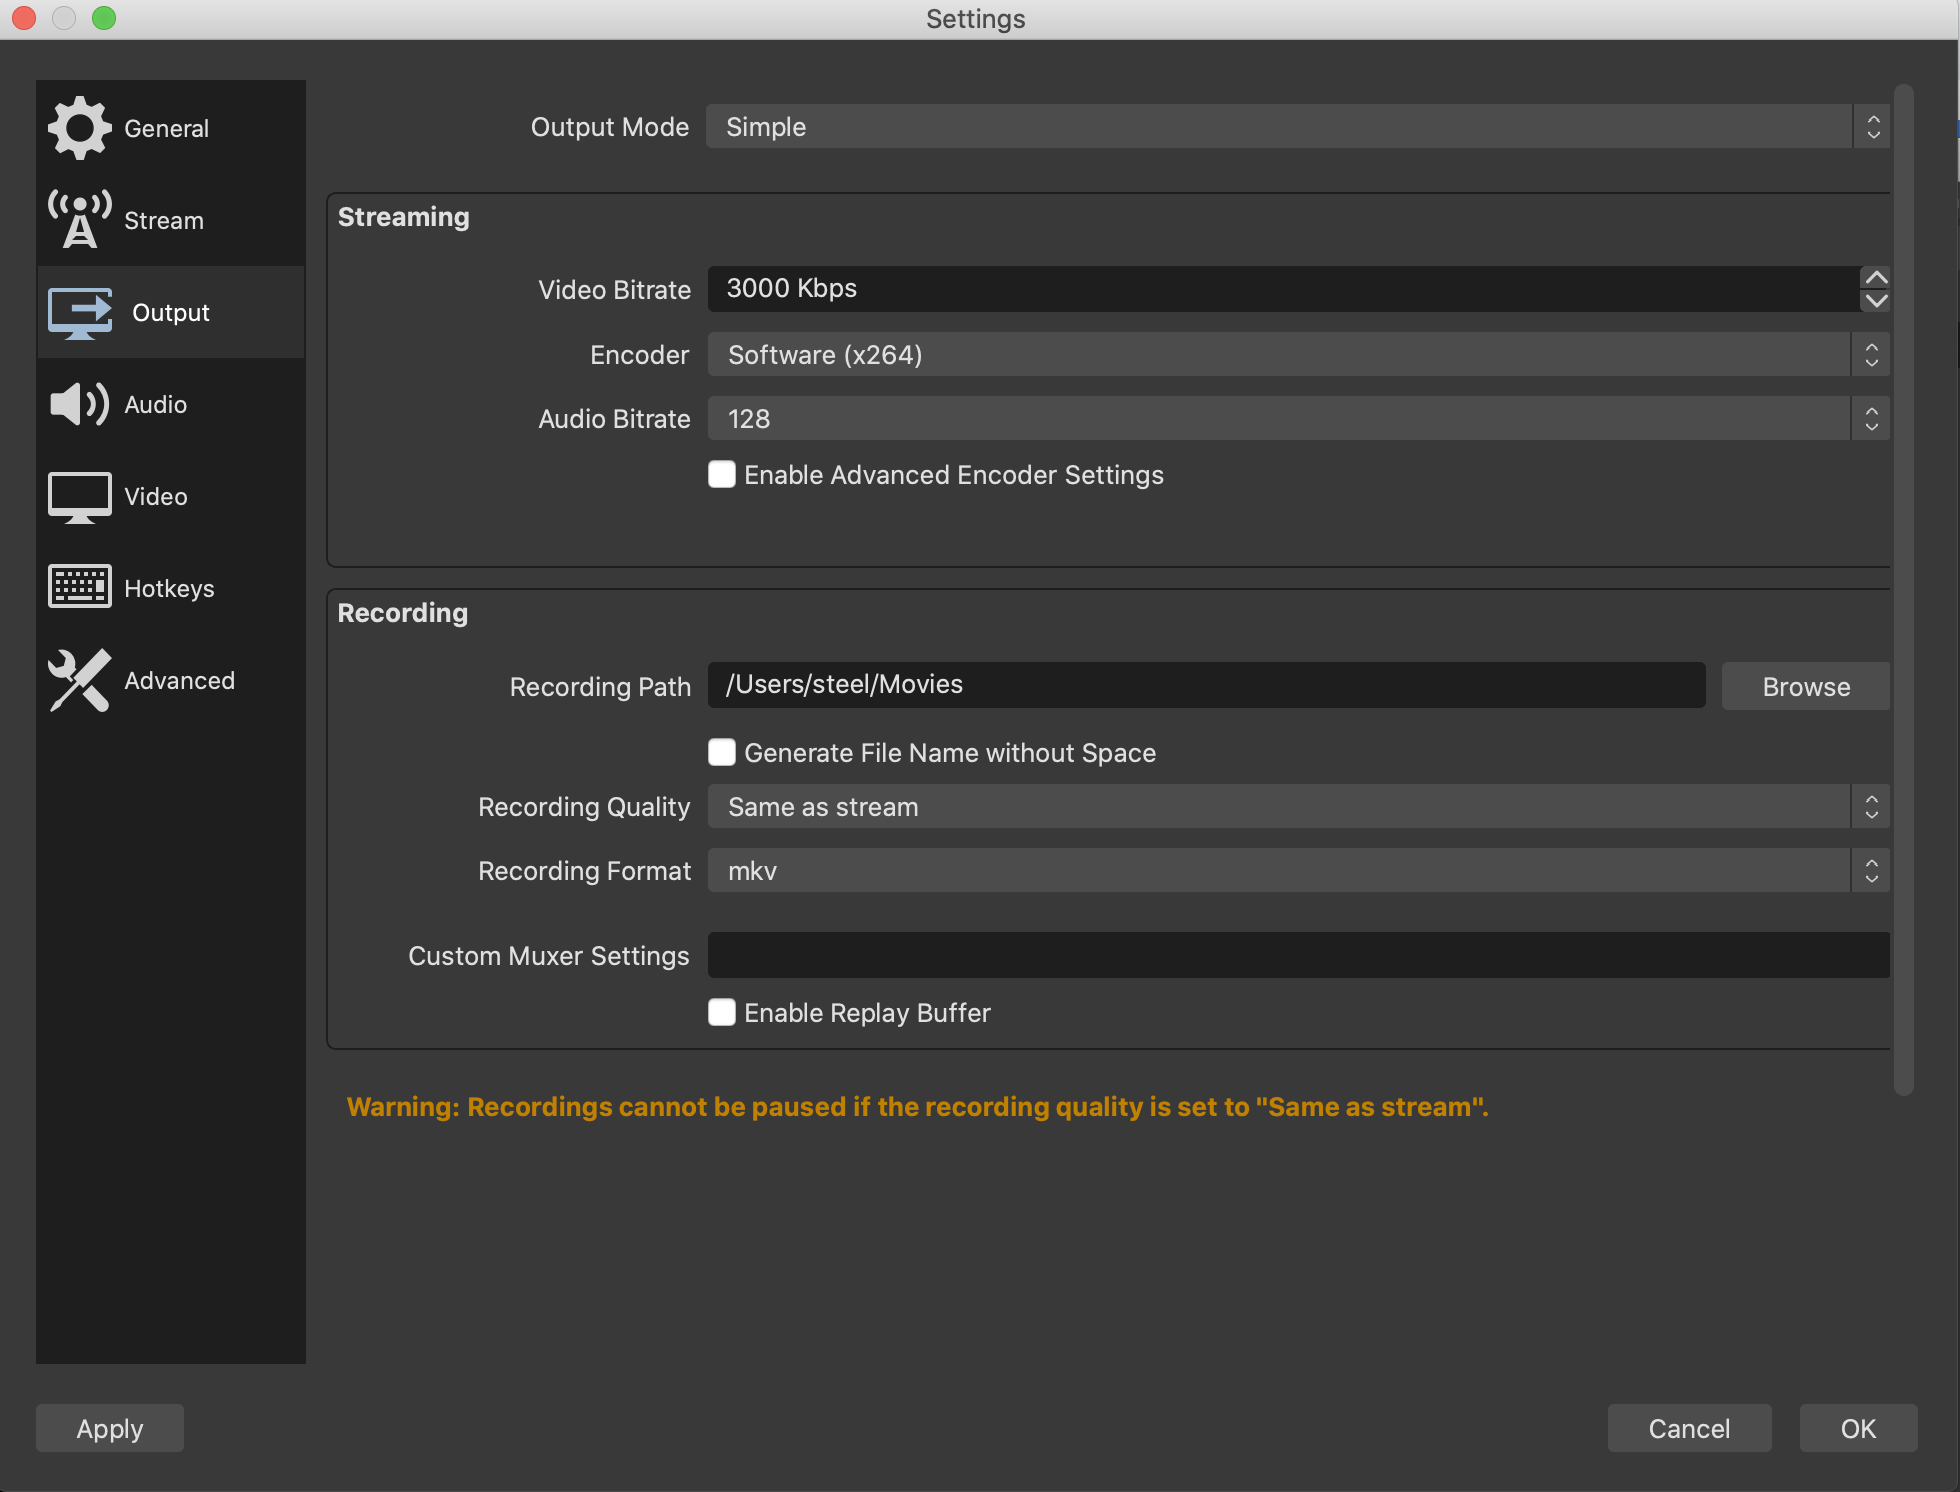
- Click "Output"
- Choose "Simple" from the dropdown list.
- Set the Video Bitrate in the middle of what your network can handle using the chart above.
- Set the encoder to Software (x264)
- Set Audio Bitrate to 128
- Click on Audio tab
- Set Sample Rate to 44.1
- Set Channels to "Stereo"

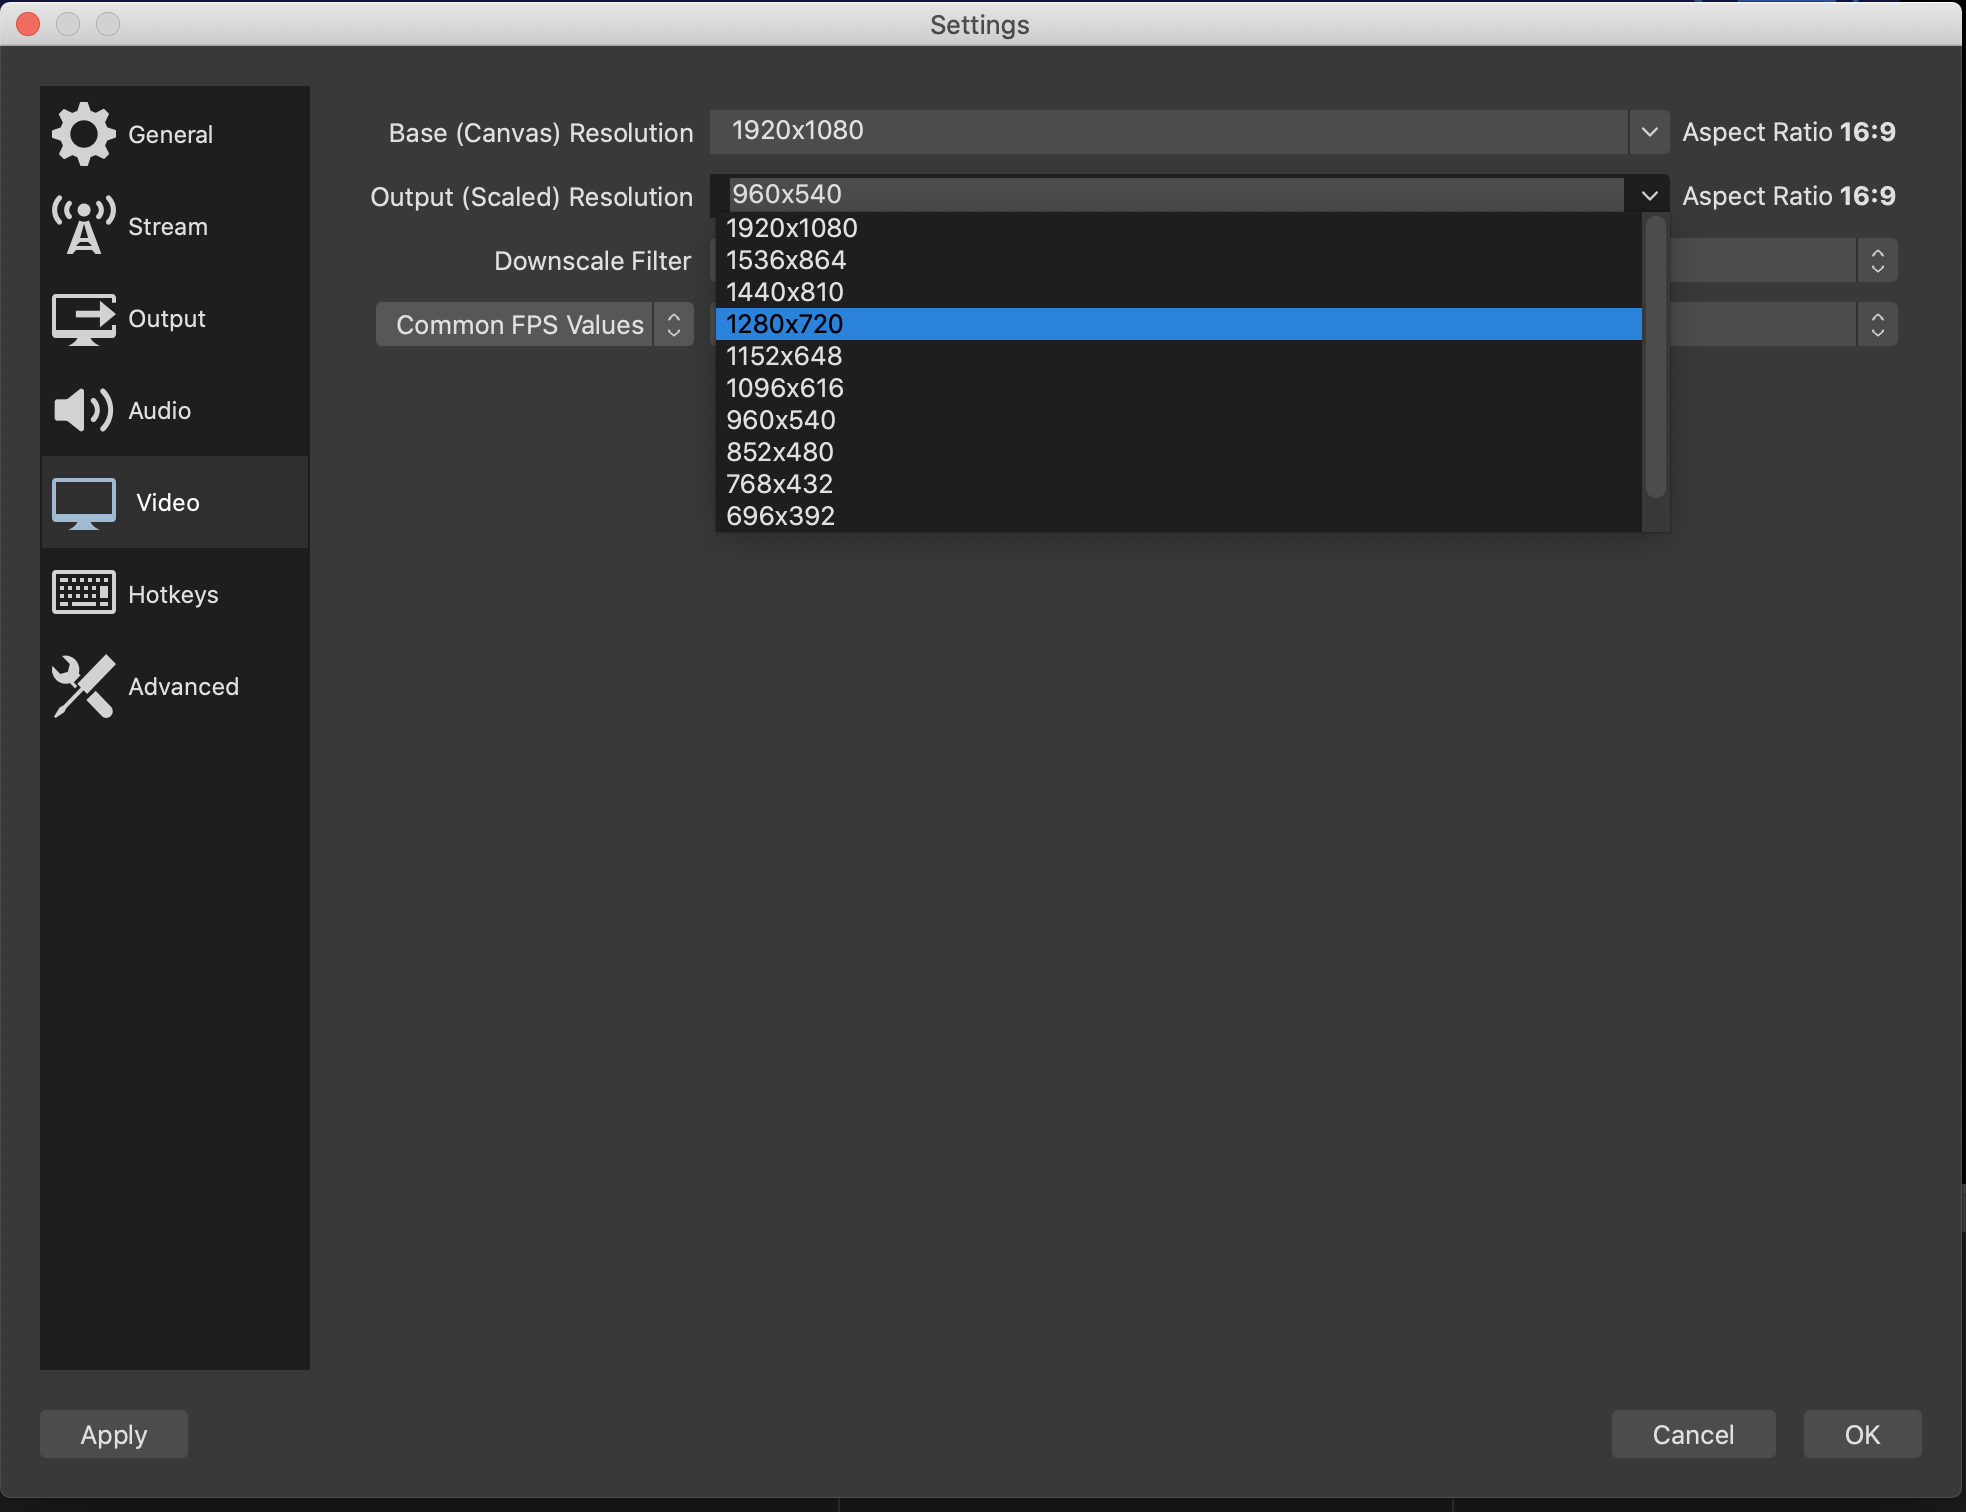
- Click on Video Tab
- If your internet speeds allow you to stream 1080, set Base and Output Resolution to 1920 X 1080
If your internet speeds allow you to stream BELOW 1080 set the Output Resolution (second field) to what your network allows based on the chart above and set the Base Resolution to the highest quality of your camera or video content (ie. if your cameras or video content comes in at 1080 set to 1080. If it comes in at 720 set to 720.
- Set the Downscale filter to Bicubic
- Suggested frame rate is max 30fps but refer to your cameras frame rate.
- Click OK
- It is recommend you use an audio interface with your computer to get the best sound. Here is a link to our recommendations: https://showtix4u.helpsite.com/articles/57271-recommended-streaming-audio-interfaces.
- Click the "Start Streaming" Button in the lower right to go live. It can take up to 30 seconds for the stream to be seen in ShowTix4U.
- DO NOT STOP your stream for more than 5 minutes or you will need to get a new set of RTMP credentials out of ShowTix4U and put into OBS.
- Mobile devices (to use their cameras): https://showtix4u.helpsite.com/articles/57284-connecting-mobile-devices-to-obs
- DSLR Cameras: https://showtix4u.helpsite.com/articles/57267-connecting-dslr-cameras-to-obs
Integrations:
Integrate Skype calls into OBS via NDI
https://www.skype.com/en/content-creators/
- Test your internet speed before your event: https://www.speedtest.net/. A reminder to set your resolutions based on upload speed: https://showtix4u.helpsite.com/articles/55383-live-stream-recommended-settings
- If you have the ability to hardwire your internet, DO IT. Wireless will work, but wired is more stable and eliminates a failure point.
- Have a backup device prepared in case of hardware failure.
- Do not watch the stream on the same network as you are Uploading. Not an issue for rehearsal but a NO for your live show.
- Go live EARLY! You can stream up to 4 hours, no need to wait until showtime to stream. This will give you time to troubleshoot any issues.